|
Smart Bus Controller Installation Guide.pdf |
Troubleshooting
The RGB LED light indicator can be used to diagnose the status of the bus controller. The LED light indicator will turn on shortly after power on. Under normal circumstances, the first color displayed is GREEN. This indicates that the bus controller is not yet connected to the internet through 4G. It will take at least 2 minutes to indicate BLUE or PURPLE once internet connection is established. It may take longer depending on signal reception and may not change color at all if the antenna is not fastened properly or if the GPS and 4G antenna is swapped.
When the LED light indicator turns to PURPLE from GREEN, this indicates that internet connection is established but GPS reception is not. This will take some time (up to 30 minutes for first boot) depending on signal reception. For best signal, position the GPS antenna near a window and do not place directly on metal surfaces. Once the Bus Controller GPS is satellite fixed, the LED indicator will turn BLUE. In this state, the GPS data is collected every 5 seconds. From time to time, the LED may switch back and forth between BLUE and PURPLE to indicate GPS signal reception. This is normal as the GPS may struggle to acquire continuous signal especially in area surrounded by tall buildings.
Under no normal circumstances the LED should turn RED. This indicates a fault and a power reset should be attempted. If the appearance of RED LED is prolonged or intermittent, please contact our support team.
Troubleshooting with Debug Port
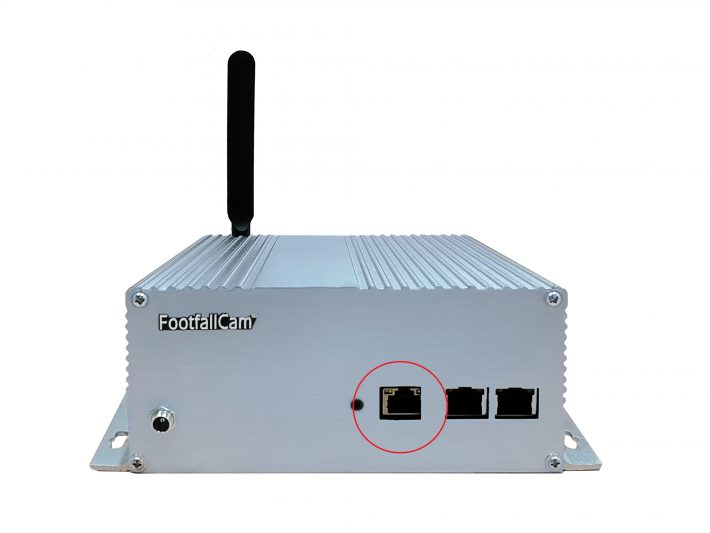
For more advanced diagnosis, there is a RJ45 debug port (circled in the diagram below) for diagnosis over SSH. Connect a Ethernet cable from the debug port to a computer. You will also need a SSH client such as Putty (https://www.chiark.greenend.org.uk/~sgtatham/putty/latest.html) installed on your computer.
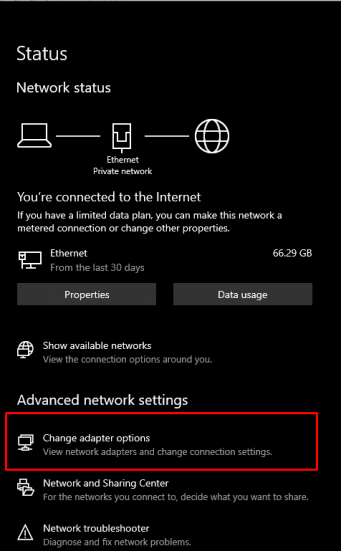
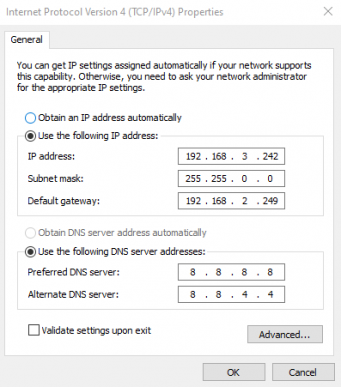
The Ethernet IP address on the computer has to be configured to a private network address with specific subnet - 192.168.3.x to communicate with the bus controller. To do this in Windows, go to Network & Internet settings and choose Change Adapter Options.
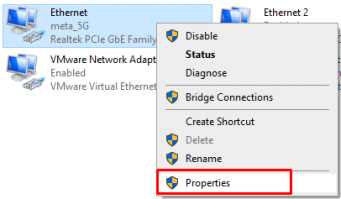
Right click on the Ethernet interface and select Properties.
In Ethernet Properties, select Internet Protocol Version 4 (TCP/IPv4) and select Properties.
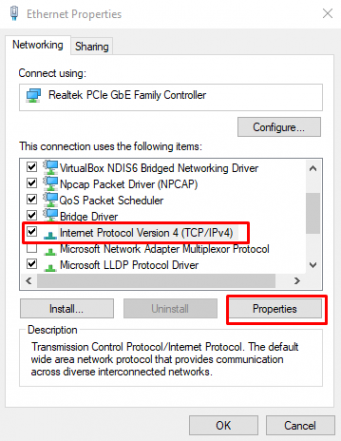
Enter the following IP address settings and save it. In case the IP settings has to be reverted to its original, save it somewhere so that it can be restored later.
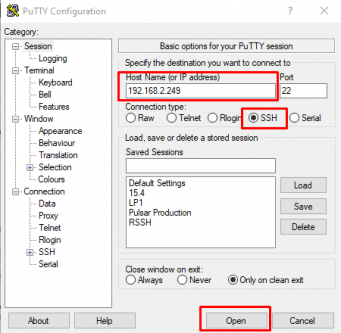
Next, open Putty and SSH into IP address of the Bus Controller at 192.168.2.249. Please obtain the login credentials from FootfallCam support if you are performing this on your own or contact us for assistance.
After logging into the Bus Controller, type the following command to check if all critical processes are running (some process name are hidden for security reasons).
sudo monit summary
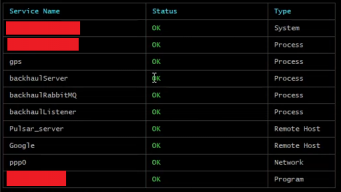
If any of these processes has a FAIL status, please contact our support team for further diagnosis. Otherwise the Bus Controller should be functioning as expected.


