


6.1 Automated Alert and Scheduled Report Configuration
The rule configurations are required to automatically trigger an alert when the trigger condition is met or to schedule a report to be sent to the specific recipient group(s) on a regular basis.
6.1.1 Create New Recipient Group
6.1.1.1 New Email / Mobile App Recipient Group

STEP 1 - Access to FootfallCam Analytic Manager V8™: http://portal.footfallcam.com/Account/Login via browser.
STEP 2 - Click on Automated Alert > Recipient Group to access the Recipient Group page.
STEP 3 - Click on + New Recipient Group button to access the Recipient Group Form.
STEP 4 - Input group name, select Email/Mobile App gateway and select the User Selection according to your needs. Refer to description below for User Selection details.
STEP 5 - Complete the process by clicking on Add button.
|
Item |
Description |
|
1. Recipient Group Name |
Display name of recipient group. |
|
2. Gateway |
Notification receiving platform: Email / Mobile App (Info: Gateway selected cannot be changed after creation.) |
|
3. User Selection |
Based on User Group: All users in the user group selected will receive email notification. For more details in user group, please refer to Chapter 5: User Group and User Setting. Custom User List: All existing portal user's email will be displayed at the Available List. Select the user's email to be included in the Recipient Group. |
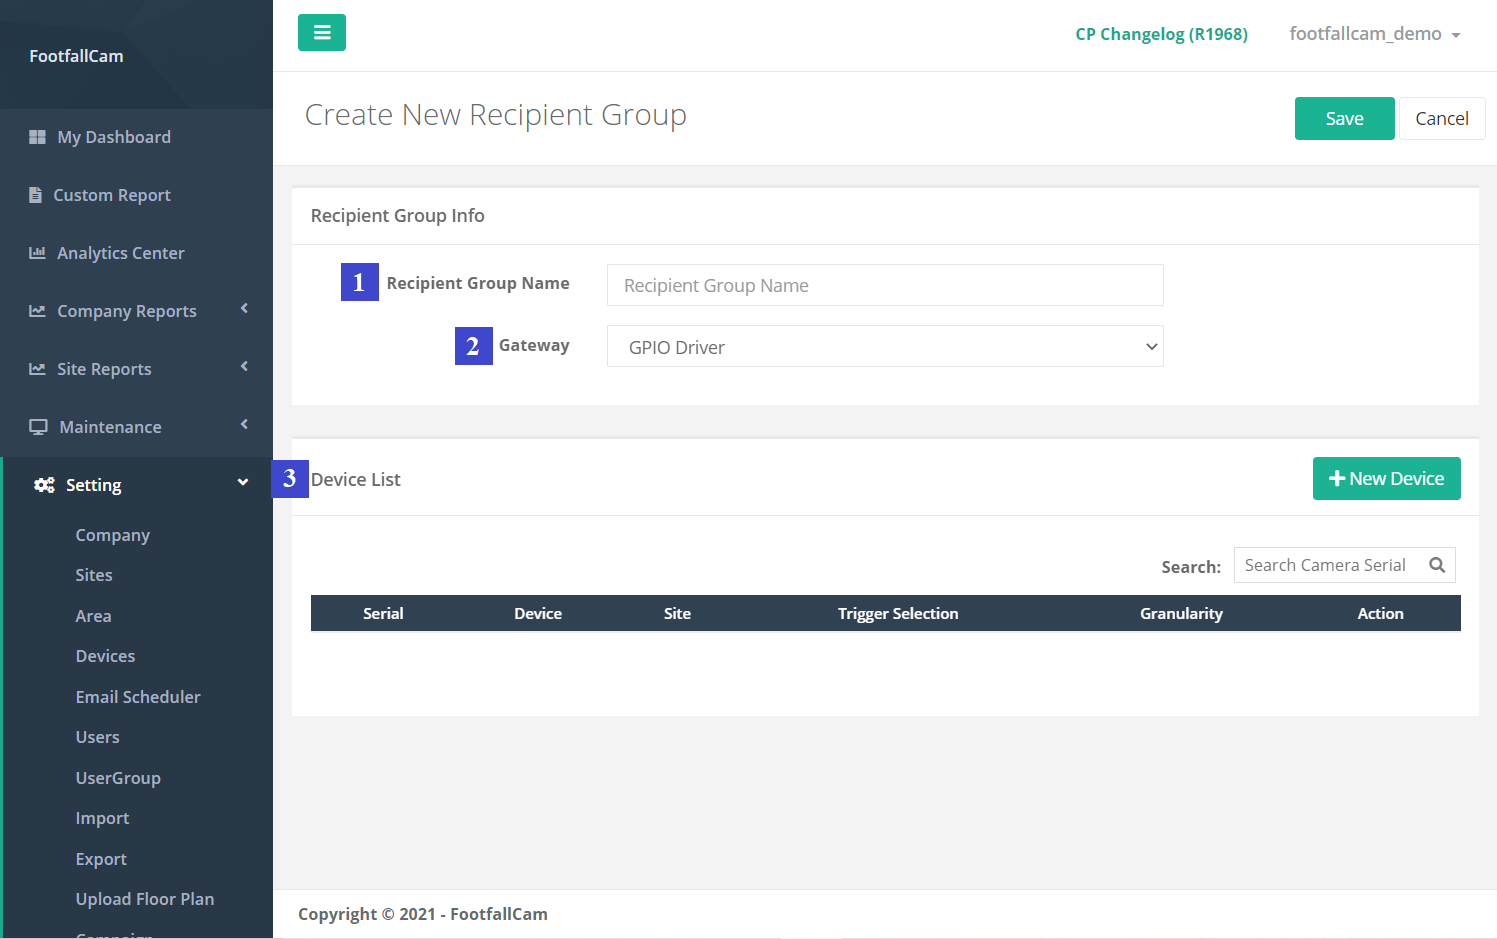
6.1.1.2 New GPIO Recipient Group
STEP 1 - Access to FootfallCam Analytic Manager V8™: http://portal.footfallcam.com/Account/Login via browser.
STEP 2 - Click on Automated Alert > Recipient Group to access the Recipient Group page.
STEP 3 - Click on + New Recipient Group button to access the Recipient Group Form.
STEP 4 - Input group name, select GPIO Driver gateway, then click on + New Device to add the output device.

STEP 5 - Input the device serial in Serial field and select the Trigger Selection.
STEP 6 - Add the device by clicking on Add button. You may add multiple devices in the same recipient group which work with the same rule.
STEP 7 - Complete the process by clicking on Save button.
|
Item |
Description |
|
1. Recipient Group Name |
Display name of recipient group. |
|
2. Gateway |
Notification receiving platform: GPIO Driver (Info: Gateway selected cannot be changed after creation.) |
|
3. Device List |
Devices that had been verified for GPIO usage which is ready to be used. |
|
4. Serial |
Input the serial number of the GPIO device to be added into the list. |
|
5. Trigger Selection |
To which configured site / area threshold will the device serial be listening to. (Info: Each device can only listen to one (1) trigger selection and send the triggers when the triggered condition is met) |
6.1.2 Edit Recipient Group
STEP 1 - Click on Automated Alert > Recipient Group to access the Recipient Group page.
STEP 2 - Select template to manage and click Edit to access the output template page.
STEP 3 - Edit the required content and complete process by clicking on Save.
6.1.3 Delete Recipient Group
STEP 1 - Click on Automated Alert > Recipient Group to access the Recipient Group page.
STEP 2 - Select template to manage and click Edit to access the Recipient Group form.
STEP 3 - Click Delete and then Yes to complete the template deletion.
6.2 Email Template Configuration
Email message can be customised according to user's preference. User can create and configure email template different purposes.
6.2.1 Create Email Template

STEP 1 - Click on Automated Alert > Output Template to access the output template page.
STEP 2 - Click on + New Template to access the Output Template Form.
STEP 3 - Fill in all required details and select Template Type as Email.
STEP 4 - Complete the process by clicking on Add.
|
Item |
Description |
|
1. Template Name |
Display name of template. |
|
2. Template Type |
Select relevant template selection. |
|
3. Email Subject |
Title or text which will be sent as email subject for the email template. |
|
4. Email Outpost Server |
Email outpost which will be responsible on sending this email template. |
|
5. Email Content |
Email content which will be sent out and received by recipient. |
|
6. + Dynamic Expression |
To add dynamic expression into email content. |
6.2.2 Create Message Template
STEP 1 - Click on Automated Alert > Output Template to access the output template page.
STEP 2 - Click on + New Template to access the Output Template Form.
STEP 3 - Fill in all required details and select Template Type as Message.
STEP 4 - Complete the process by clicking on Add.
|
Item |
Description |
|
1. Template Name |
Display name of template. |
|
2. Template Type |
Select relevant template selection. |
|
3. Message Content |
Message content which will be sent out and received by recipient. |
|
4. + Dynamic Expression |
To add dynamic expression into email content. |
6.2.3 Edit Template
STEP 1 - Click on Automated Alert > Output Template to access the output template page.
STEP 2 - Select template to manage and click Edit to access the output template page.
STEP 3 - Edit the required content and complete process by clicking on Save.
6.2.4 Delete Template
STEP 1 - Click on Automated Alert > Output Template to access the output template page.
STEP 2 - Select template to manage and click Edit to access the output template page.
STEP 3 - Click Delete and then Yes to complete the template deletion.
6.3 Alert Rules
Alert rules are the notification trigger conditions which notify user when the rules are fulfilled.
6.3.1 Create Triggered Alert Rule for Email
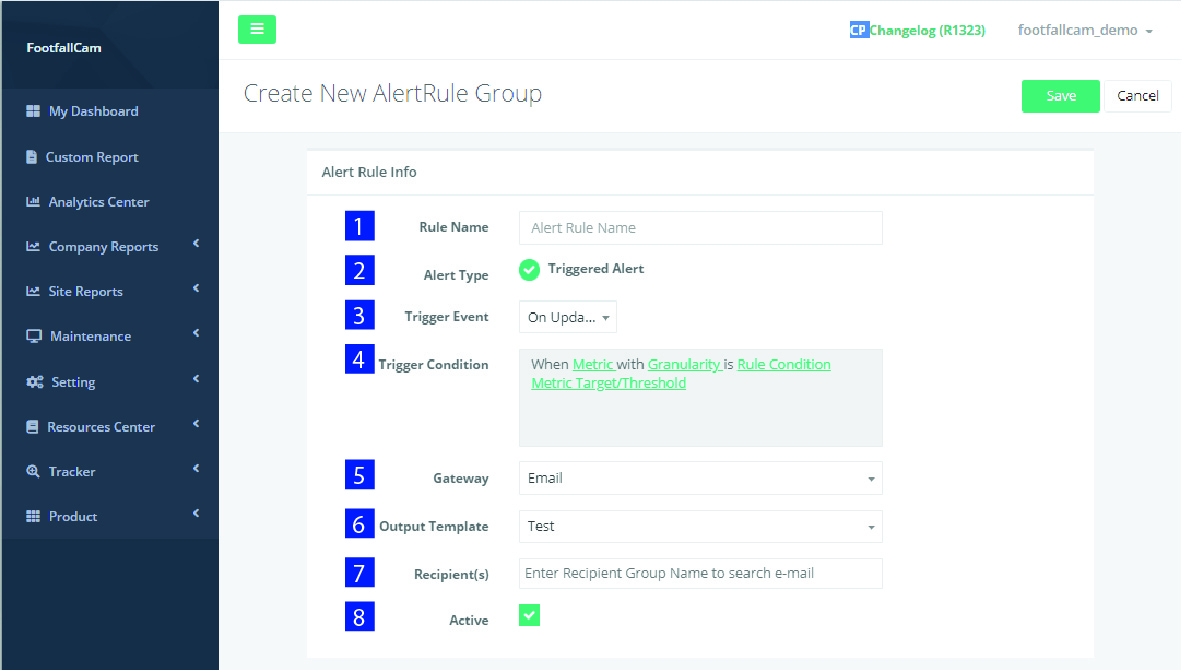
STEP 1 - Click on Automated Alert > Output Template to access the output template page.
STEP 2 - Click on + New Alert Rule to access the Alert Rule Form.
STEP 3 - Choose the trigger event and configure the trigger condition.
STEP 4 - Select Email as Gateway, Output Template to be sent and Recipient Group to receive notification.
STEP 5 - Complete the process by clicking Save.
|
Item |
Description |
|
1. Rule Name |
Display name of rule. |
|
2. Alert Type |
Selection type of alert to configure. |
|
3. Trigger Event |
Selection of trigger event for triggered type alert. |
|
4. Trigger Condition |
Configure the trigger condition for the rule by clicking the link to select conditions. |
|
5. Gateway |
Selection of communication pathway. |
|
6. Output Template |
Selection of output template for the selected gateway. |
|
7. Recipient(s) |
Selection of Recipients Group based on the selected gateway. |
|
8. Active |
To mark the rule as active or inactive to send out triggers. |
6.3.2 Create Triggered Alert Rule for GPIO
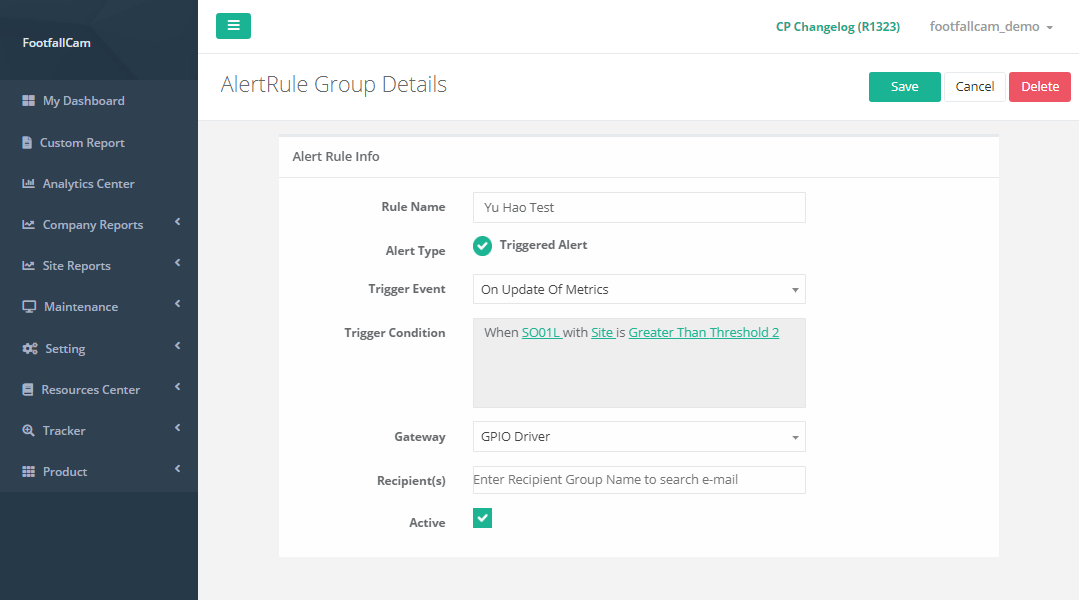
STEP 1 - Click on Automated Alert > Output Template to access the output template page.
STEP 2 - Click on + New Alert Rule to access the Alert Rule Form.
STEP 3 - Choose the trigger event and configure the trigger condition.
STEP 4 - Select GPIO Driver as Gateway and Recipient Group to listen to the driver.
STEP 5 - Complete the process by clicking Save.
6.3.3 Edit Rule
STEP 1 - Click on Automated Alert > Alert Rule to access the alert rule page.
STEP 2 - Select alert rule to manage and click Edit to access the alert rule form.
STEP 3 - Edit the required content and complete process by clicking on Save.
6.3.4 Delete Rule
STEP 1 - Click on Automated Alert > Output Template to access the alert rule page.
STEP 2 - Select template to manage and click Edit to access the alert rule form.
STEP 3 - Click Delete and then Yes to complete the alert rule deletion.
6.4 Email Outpost Server
For user using their own server, email outpost server configuration is required for the scheduler to send emails successfully.
6.4.1 Create New Email Outpost Server
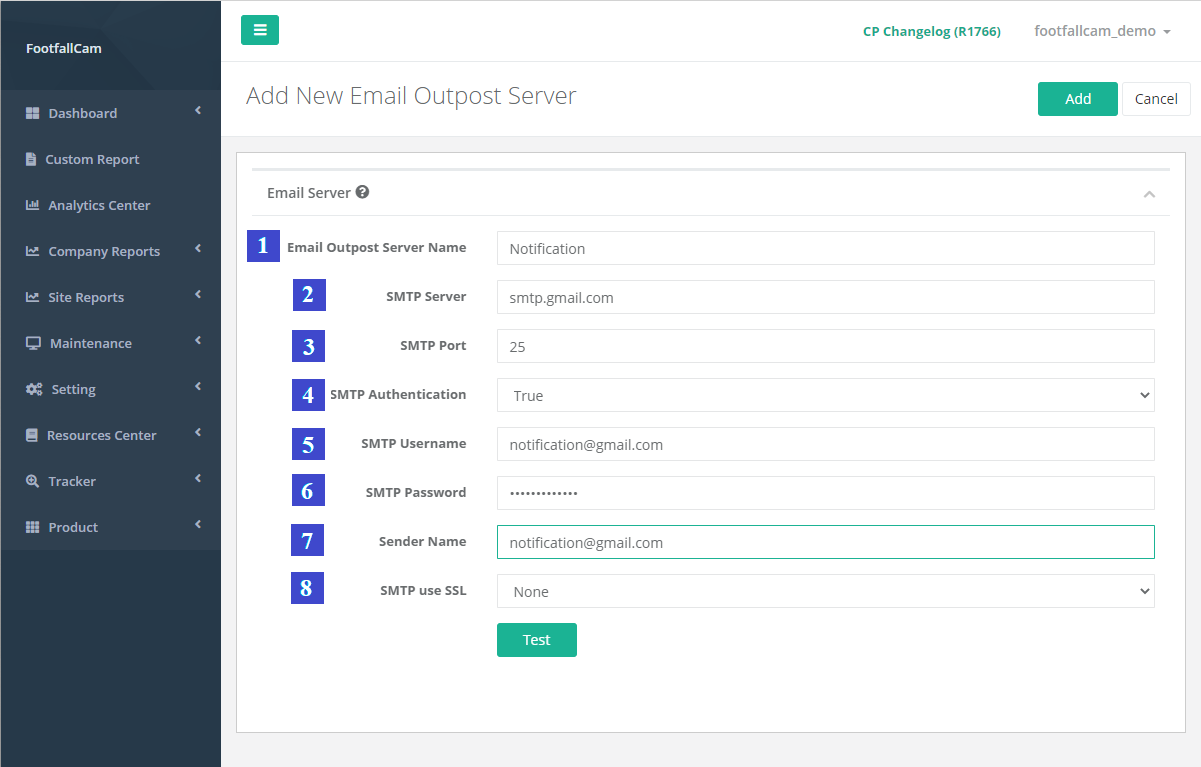
STEP 1 - Click on Automated Alert > Email Outpost Server to access the Email Outpost Server page.
STEP 2 - Click on + New Email Outpost Server to access the Email Outpost Server Form.
STEP 3 - Fill up the information required in the form.
STEP 4 - Click on the Test button to make sure the setup is done correctly.
STEP 5 - Enter a recipient email's address in the Test SMTP Server pop-up. A success message will pop-up to indicate the email is send to recipient email address successfully.
STEP 6 - Click on the Add button to save it once the test is successful.
| Item | Description |
| 1. Email Outpost Server Name | Enter your preference Email outpost server name. |
| 2. SMTP Server | The server that powers the protocol to send, receive and relay outgoing emails between senders and receivers. You may found the SMTP server hostname from SMTP server configuration or consult your technical team. |
| 3. SMTP Port | The standard mail server used to send email to another server across the internet. You may found the SMTP port number from SMTP server configuration or consult your technical team. |
| 4. SMTP Authentication | Select whether authentication is required. |
| 5. SMTP Username | Enter your email address. |
| 6. SMTP Password | Enter your the email's login password. |
| 7. Sender Name | Enter the sender's email address. |
| 8. SMTP use SSL | The security connection whether encryption is applied. You may select auto if you are unsure or consult your technical team. |
6.4.2 Manage Email Outpost Server
STEP 1 - Click on Automated Alert > Email Outpost Server to access the Email Outpost Server page.
STEP 2 - Select email outpost server to manage and click Edit to access the Email Outpost Server form.
STEP 3 - Update the required content and click Test to make sure the server is work correctly.
STEP 4 - Click the Save button to save the changes.
6.4.3 Delete Email Outpost Server
STEP 1 - Click on Automated Alert > Email Outpost Server to access the Email Outpost Server page.
STEP 2 - Select email outpost server to manage and click Edit to access the Email Outpost Server form.
STEP 3 - Click Delete then click YES to complete the email outpost server deletion.
6.4.4 Email Scheduler
The "Email Scheduler" Function is to use to Schedule Send a specific Report required either Daily or Weekly basis. With the function, user can monitor the data of the counter without having to log in to portal through the PDF report being sent to the desired email.
STEP 1 - Click on Setting > Email Scheduler to access the Email Scheduler Function.
STEP 2 - User Groups Tab > Click On Add User Group to add New User Group for the Email Scheduler.
STEP 3 -User Group Name: Enter Any Name
Enter Tags to Search Email: Any email registered to get email address from the database.
Enter Email here: Add any email address you would like the email to be sent to.
STEP 4 - Email Scheduler Tab > Click Add Email Scheduler
STEP 5 - On the Add Email Scheduler Tab
| Item | Description |
| 1. Report | Select the type of report you would like to be scheduled and send. Options of Reports Available:  |
| 2. Sites | If Site Reports is selected, please select the "Site" you required. |
| 3. Recipient Email | i) Group - Select the "User Group" Defined ii) +Add Single Email - Input Email Address you would wish to be send to |
| 4. Schedule Time | Select the Time between 07:00 to 23:00 for the report selected to be send. Please note that the Time Zone will be your local company time zone. |
| 5. Status | i) Active - Function will be activated and report will be send. ii) Inactive - Function will be deactivated and report will not be send. |
STEP 6 - System Notification - On the System Function Notification Required, Input Recipient and Select Status.
Recipient: Select Group - Select the "User Group" Defined or +Add Single Email - Input Email Address you would wish to be send to.
Status: Active or Inactive
History Log - Display History Log of Scheduled Email and Notification Sent.