
Counting data is usually tied to the site available for the company. Setting up and configuring the site detail is important to ensure the data collected factor in the analytics and report view in the correct standard.
2 ways for user to set up site details:
a.) Set up site individually - when there is a ac hoc site to add for a specific period of time.
b.) Bulk import site details - Usually using during a big rollout of the sites installation within a short period of time
3.1 Set up site individually
https://youtube.com/watch?v=RRgs3ZR03tU
STEP 1 - Access to FootfallCam Analytic Manager V8™: http://portal.footfallcam.com/Account/Login via Google Chrome.
STEP 2 - Click on Setting > Site Management to access the Site Management & Health Check page.

STEP 3 - Click on + New Site button to access the Site Info page.
STEP 4 - Complete the process by entering all the required fields and click on Save button.
|
Item |
Description |
|
1. Site Name |
Enter a preferred site name. (Info: Site name inserted will be apply to features in FootfallCam Analytic Manager V8™.) |
|
2. Site Code |
Enter a preferred site code. (Info: Site code used to identify branch within a geographic region.) |
|
3. Country |
Select the country. (Info: Country selected will be apply to features in FootfallCam Analytic Manager V8™ for mapping the branch coordination.) |
|
4. Time Zone |
Select the time zone. (Info: Time zone selected will be apply to report feature.) |
|
5. Site Group |
Select the site group. (Info: Site group added will be apply to report feature. For more information on setting up site group, refer to Chapter 3.6 Site Group Configuration.) |
|
6. Operating Hour |
Enter the operating hour for the branch. (Info: Click Add Custom Hour to configure operating hour for Public Holiday. For more information to setup operating hour, refer to 3.3.1.1 Operating Hour Setting.) |
|
7. Financial Entity |
Select the financial entity. (Info: Financial Entity will be act as the billing account of the site. Financial Entity cannot be selected when the server is offline from central server. Creation of site will be disabled if Financial Entity is not selected. ) |
3.2 Bulk import site details
 STEP 1 - Click site management page to download your existing file at Export device list button on top right.
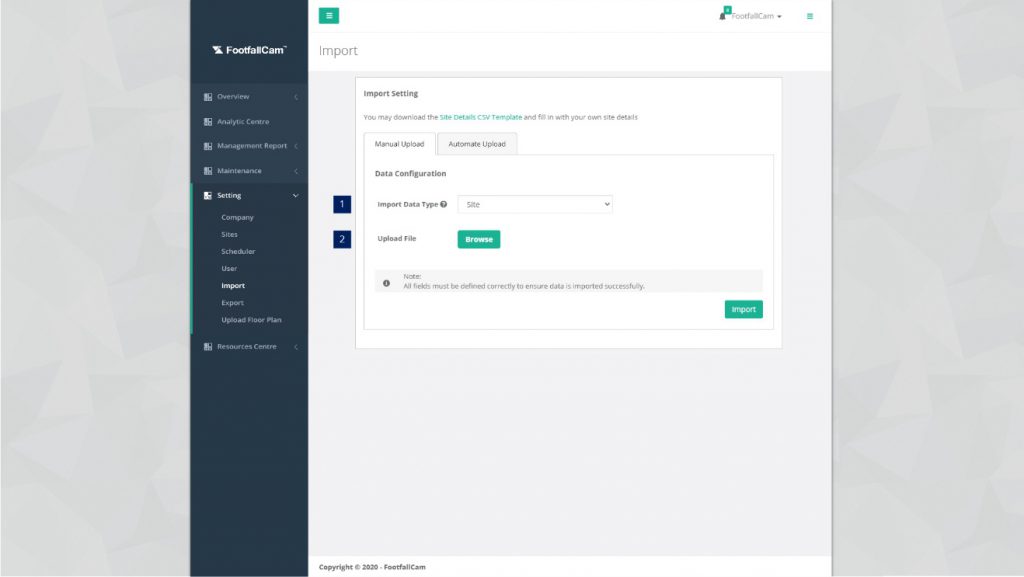
STEP2- Click on Setting > Import to access the Import page.
STEP 3 - Click on Manual Upload tab to access the Manual Upload tab.
STEP 4 - Complete the process by entering all the required fields and click on Import button.
| Item | Description |
| 1. Import Data Type | Select the Site as the import data type. |
| 2. Upload File | Browse and upload the CSV template with site detail(s). |
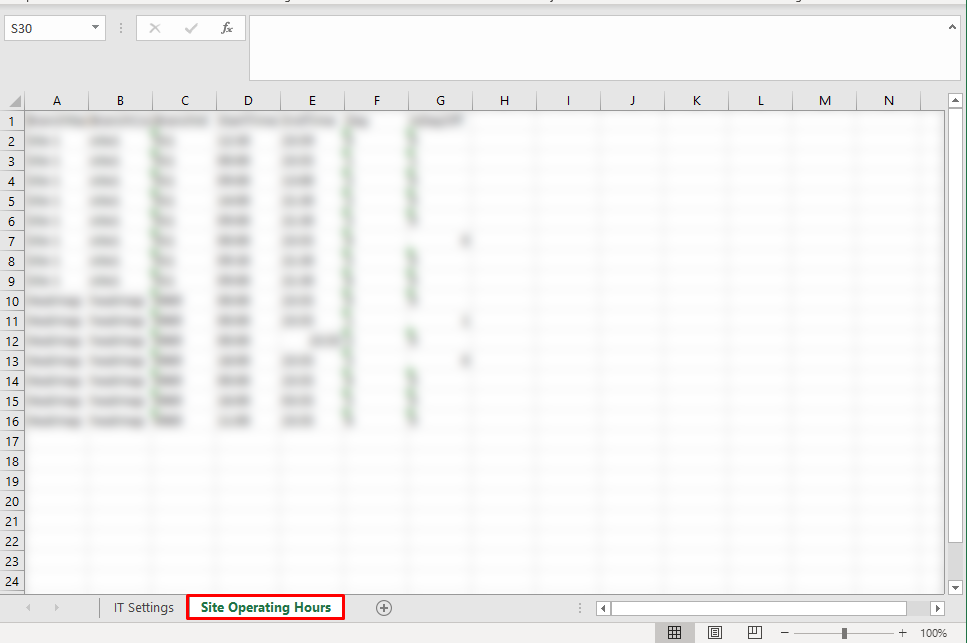
STEP 4 - Go to Site Operating Hours Tab.
STEP 5 - There are 7 columns in this tab, there are:
| Item | Description |
| BranchName | Company's Branch Name, will not affect the setting after modified |
| BranchCode | Company's Branch Code, will not affect the setting after modified |
| BranchId | Company's Branch Id |
| StartTime | Start Time of the operating hour, using 24 hours clock |
| EndTime | End Time of the operating hour, using 24 hours clock |
| Day | We are using number to indicate the day of weeks: 0 - Sunday 1 - Monday 2 - Tuesday 3 - Wednesday 4 - Thursday 5 - Friday 6 - Saturday |
| IsDayOff | 1 - The location is out of operating hour. 0 - The location is during the operating hour. |
Modify the spreadsheet as per required.
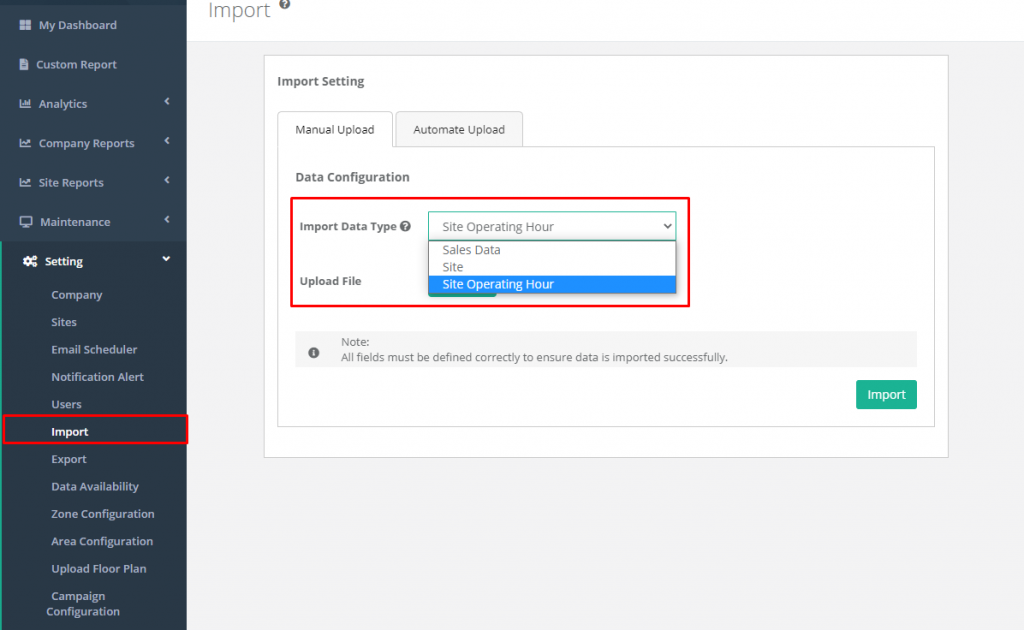
STEP 6 - After done modify the exported spreadsheet, proceed to Setting > Import > Import Setting > Import Data Type, select Site Operating Hour.
STEP 7 -Upload the spreadsheet that has been modified and press Import.
3.3 Setting Explanation
https://youtube.com/watch?v=6-jpl_KcRDU
3.3.1 Site Management & Health Check
This section focuses on the details display in site list in Site Management & Health Check page.
STEP 1 - Access to FootfallCam Analytic Manager V8™: http://portal.footfallcam.com/Account/Login via Google Chrome.
STEP 2 - Click on Setting > Site Management to access the Site Management & Health Check page.
| Item | Description |
| 1. Site | Display the site name. |
| 2. Device(s) Tuned | Display the number of devices that have been verified and the total number of device in that site. |
| 3. Site Verified Date | Display the date of the site being verified. |
| 4. Site Health Check | Display the health status of the site. |
| 5. Site Profile | Display the issue tag if any. (Info: The field will be blank if the site is working well) |
| 6. Action | A link to trigger Site page for the setting. |
3.3.2 Basic Setting
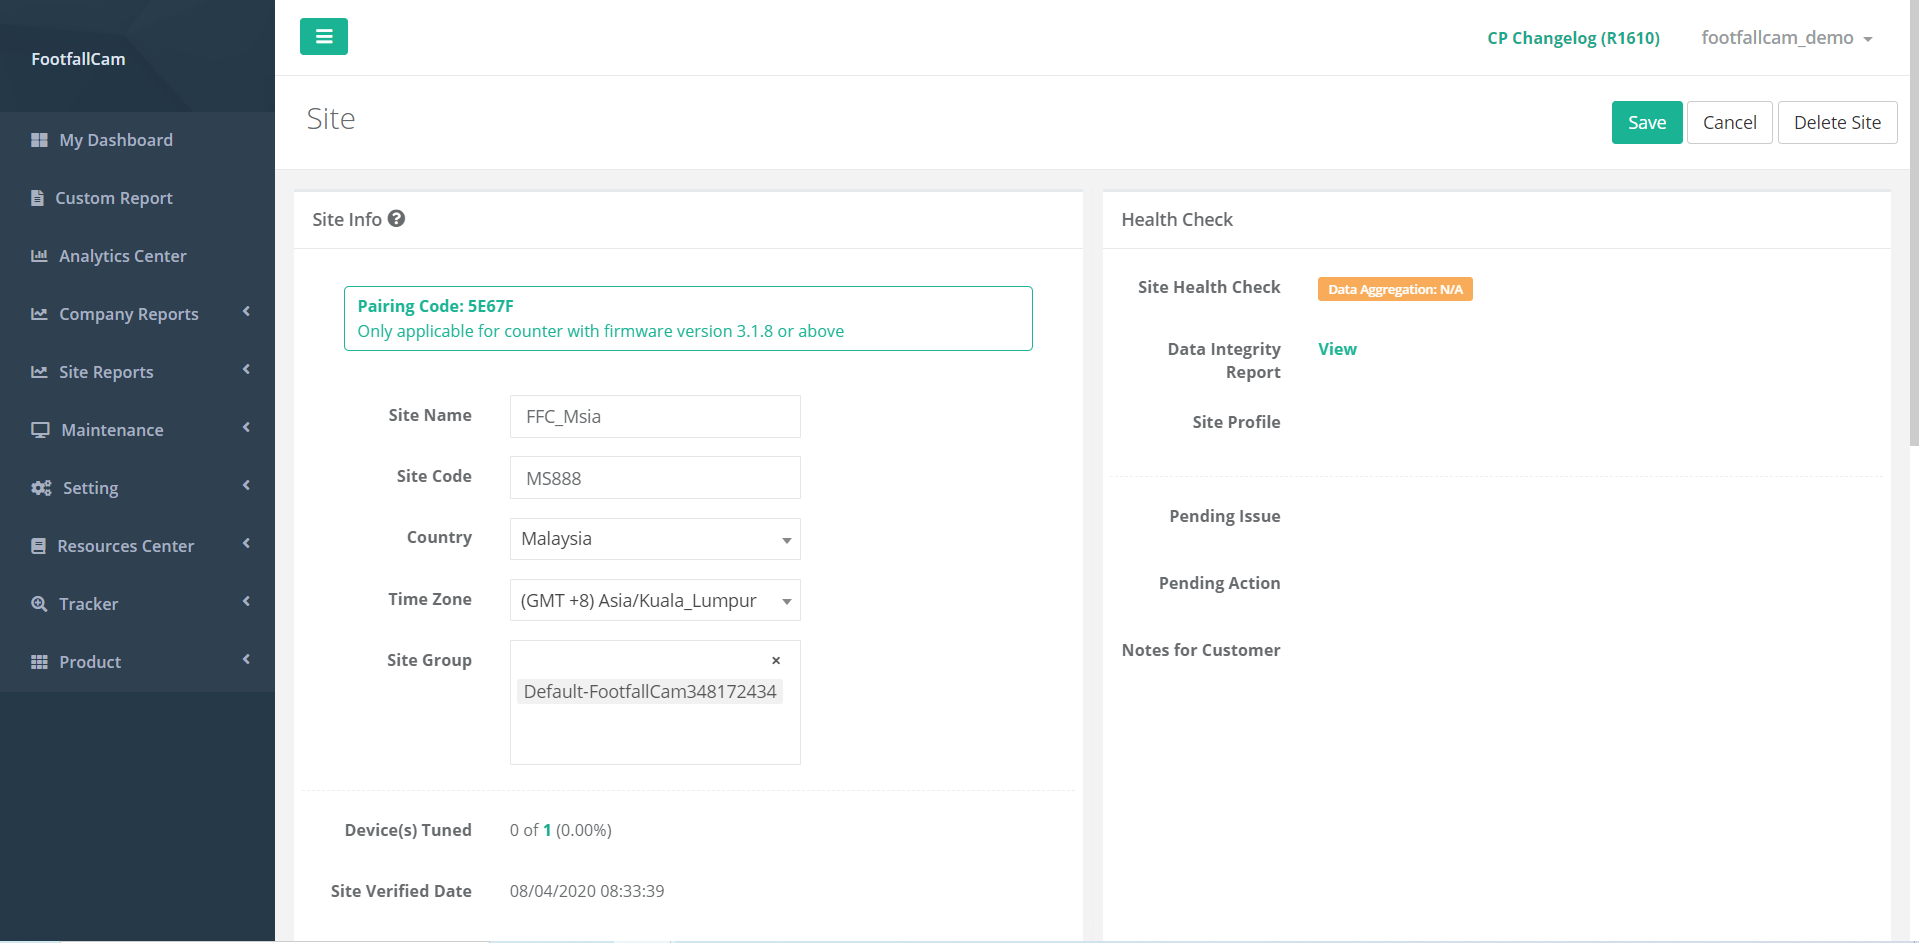
STEP 1 - Click on Setting > Site Management to access the Site Management & Health Check page.
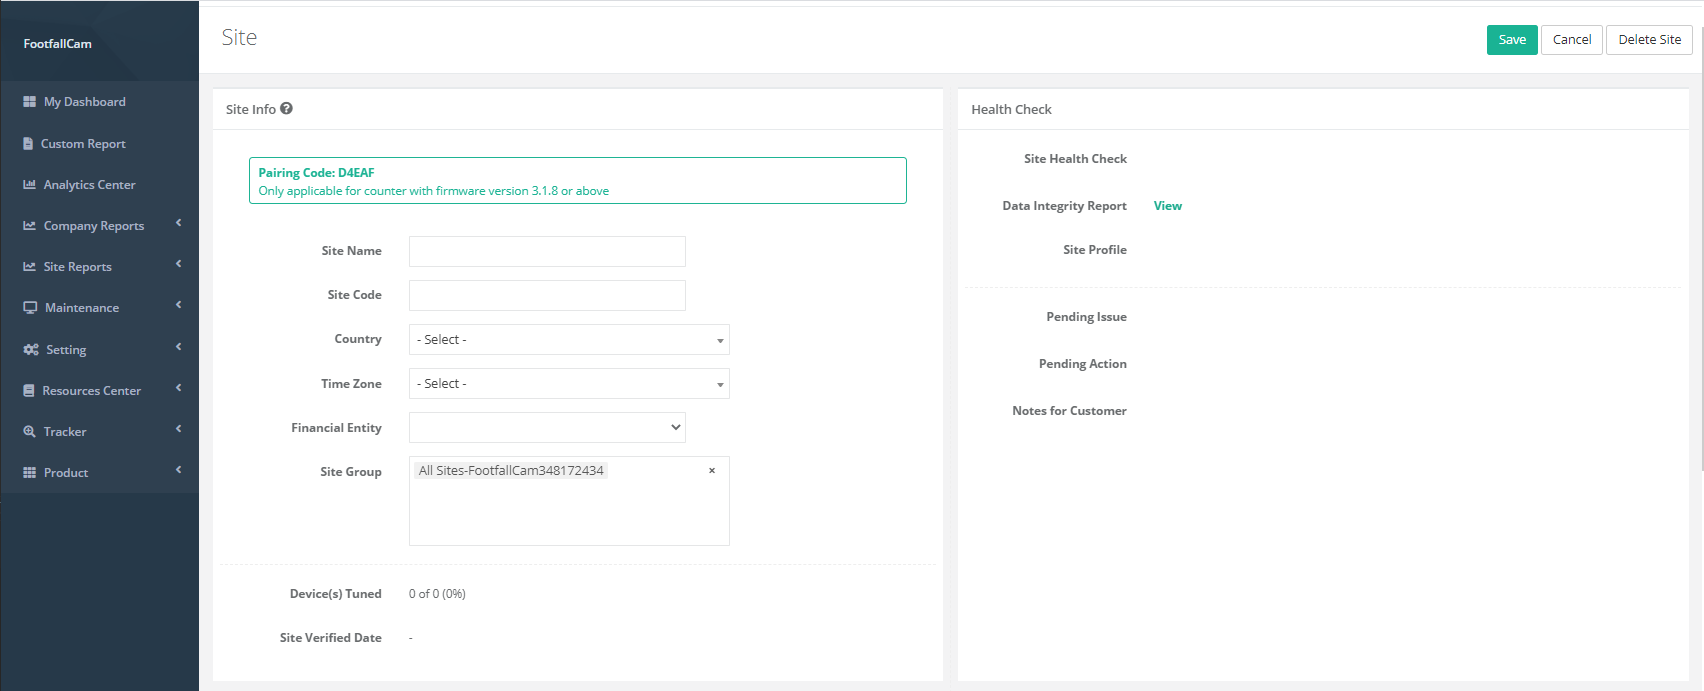
STEP 2 - Select the site and click on the Edit button to access the Site page.
STEP 3 - Update the field required and click the Save button to save the changes.


| Item | Description |
| 1. Pairing Code | Display the pairing code required for installation. |
| 2. Site Name | Display the site name. (Info: Site name inserted will be apply to features in FootfallCam Analytic Manager V8™.) |
| 3. Site Code | Display the site code. (Info: Site code used to identify branch within a geographic region.) |
| 4. Country | Display the country. (Info: Country selected will be apply to features in FootfallCam Analytic Manager V8™ for mapping the branch coordination.) |
| 5. Time Zone | Display the time zone. (Info: Time zone selected will be apply to report feature.) |
| 6. Site Group | Display the site group that used on customization of category. (Info: Site group added will be apply to report feature.) (For more information, refer to Chapter 3.6 Site Group Configuration.) |
| 7. Device(s) Tuned | Display the number of devices that have been verified, total number of devices in that site and the percentage of verified devices. |
| 8. Site Verified Date | Display the date time of the site being verified. |
| 9. Site Health Check | Display the health status of the site. |
| 10. Data Integrity Report | A link direct to the Data Integrity Report page. |
| 11. Site Profile | Display the issue tag if any. (Info: The field will be blank if the site is working well) |
| 12. Pending Issue | Display the description of issue pending to be resolved. (Info: The field will be blank if the site is working well) |
| 13. Pending Action | Display the related party for the next action. (Info: The field will be blank if the site is working well) |
| 14. Notes for Customer | Display the notes for customer if any. (Info: The field will be blank if the site is working well) |
| 15. Operating Hour | Display the operating hour of the branch. (Info: Click Add Custom Hour to configure operating hour for Public Holiday.) (For more information, refer to 3.3.2.1 Operating Hour Setting.) |
| 16. Advance Setting |
Display the site advance information includes:
|
| 17. Floor Plan | Display the floor plan setting. |
| 18. Related Ticket(s) |
Display the related Tickets details includes:
|
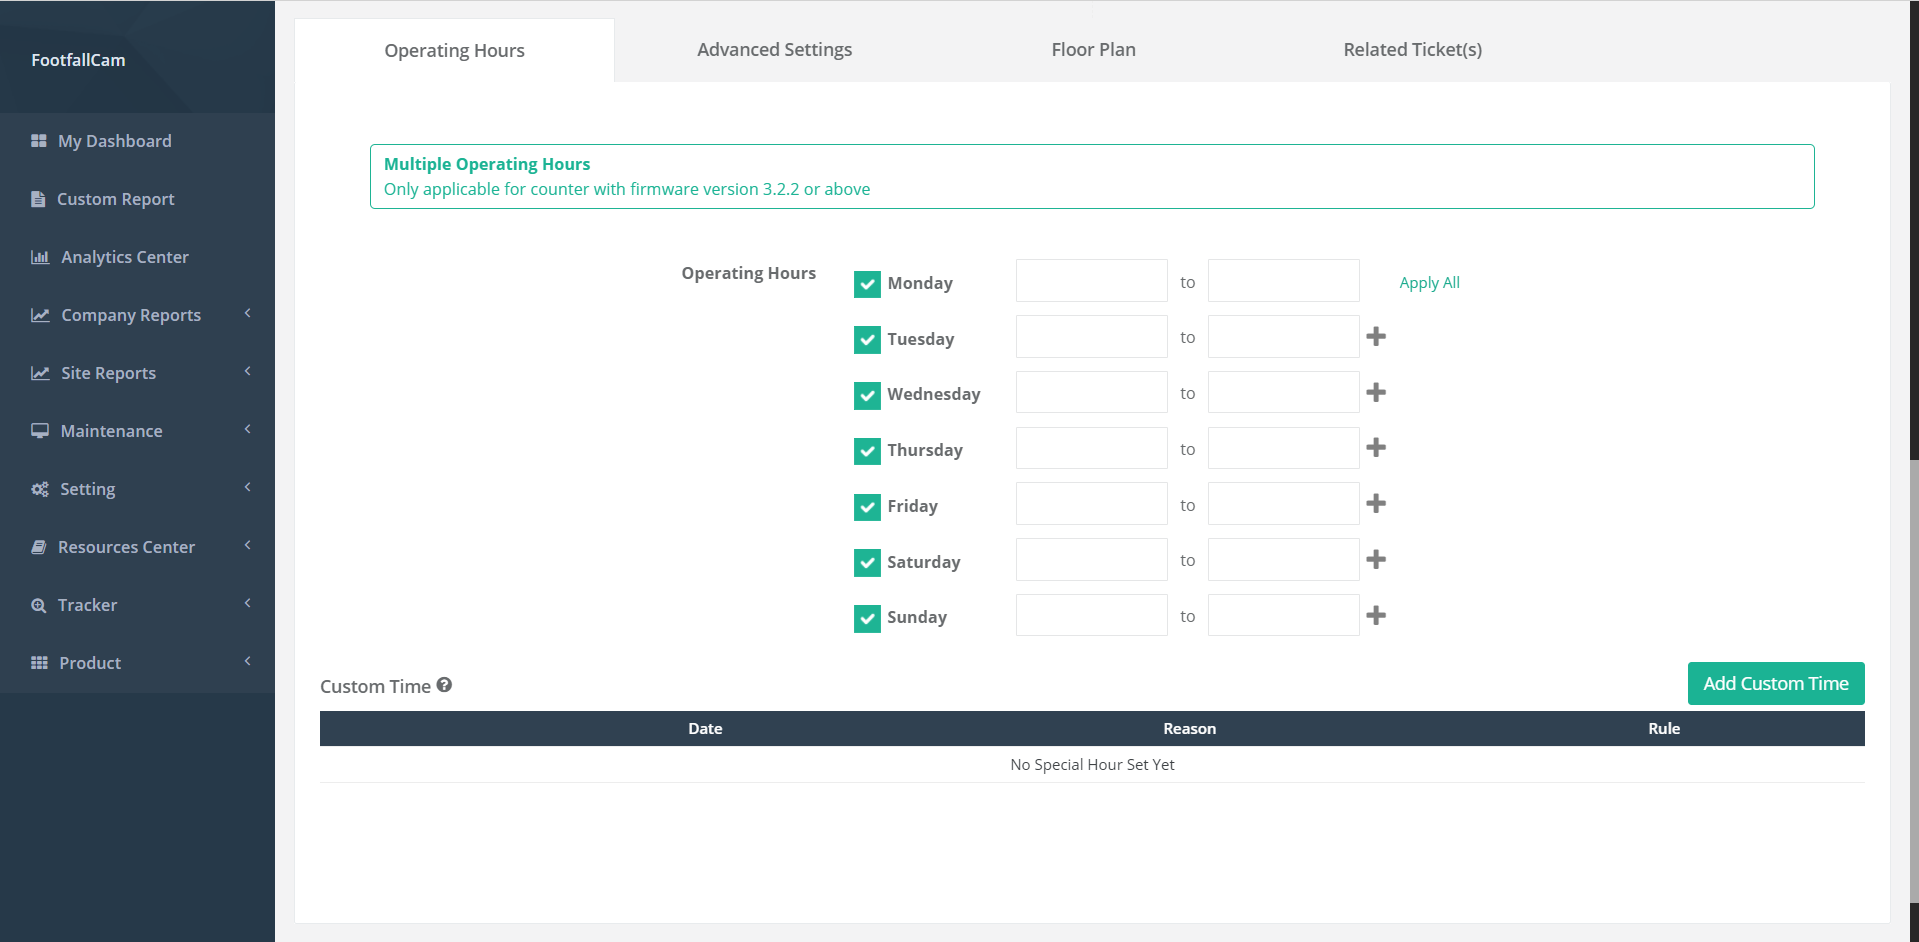
3.3.2.1 Operating Hour Setting
Users that would like to change their current store operating hour may do so from the counter management page. When a counter is operating out of its operating hour, it will enter a standby mode to preserve data and will not be counting during the time. This will prevent the counter from counting when the store is closed due to the store environment or condition.
3.3.2.1.1 Updating the operating hour
Users that would like to update their operating hour in their existing store may do so with an Admin account.
STEP 1 - Access to FootfallCam Analytic Manager V8™: http://portal.footfallcam.com/Account/Login via Google Chrome.
STEP 2 - Click on Setting > Site Management to access the Site Management & Health Check page.
STEP 3 - Select the site and click on the Edit button to access the Site page.
STEP 4 - Navigate to the Operating Hours section and amend the operating hours.
STEP 5 - Complete the step by click the Save button on the top right corner of the page.
3.3.2.1.2 Custom operating hours
Users that would like to update their custom operating hour in their existing store may do so with an Admin account. Custom operating hours is mostly used for seasonal holidays for the counter to remain in operation and counting if a store extends their operating hour specifically for a holiday, or if it closes earlier than usual.
STEP 1 - Click on Setting > Site Management to access the Site Management & Health Check page.
STEP 2 - Select the site and click on the Edit button to access the Site page.
STEP 3 - Navigate to the Operating Hours section and click Add Custom Time button to trigger the Add Custom Time pop up.
STEP 4 - Complete the process by entering all the required fields and click on Add button.
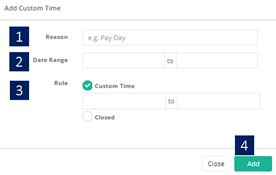
|
Item |
Description |
|
1. Reason |
The occasion for the need of a custom time |
|
2. Date range |
The set of date for the custom time option to be applied to |
|
3. Rule |
Select whether the store will be closed during the dates specified, or if a custom time is needed |
Users that would need to set custom operating hour may be configuring for several reasons. Some reasons are:
- Holiday festivities - When there is a holiday, store managers may choose to extend the operating hour for that store to accommodate the traffic and consumer behaviour. Users may set a custom operating hour instead of adjusting the normal operating hour, only to readjust it again after the end of the holiday. Likewise, this will apply for users that would like to close shop early for the day as opposed to extending the hours.
3.3.3 Network Setting
STEP 1 - Click on Setting > Sites to access the Counter Management page.
STEP 2 - Select the newly created site and click on Setting.
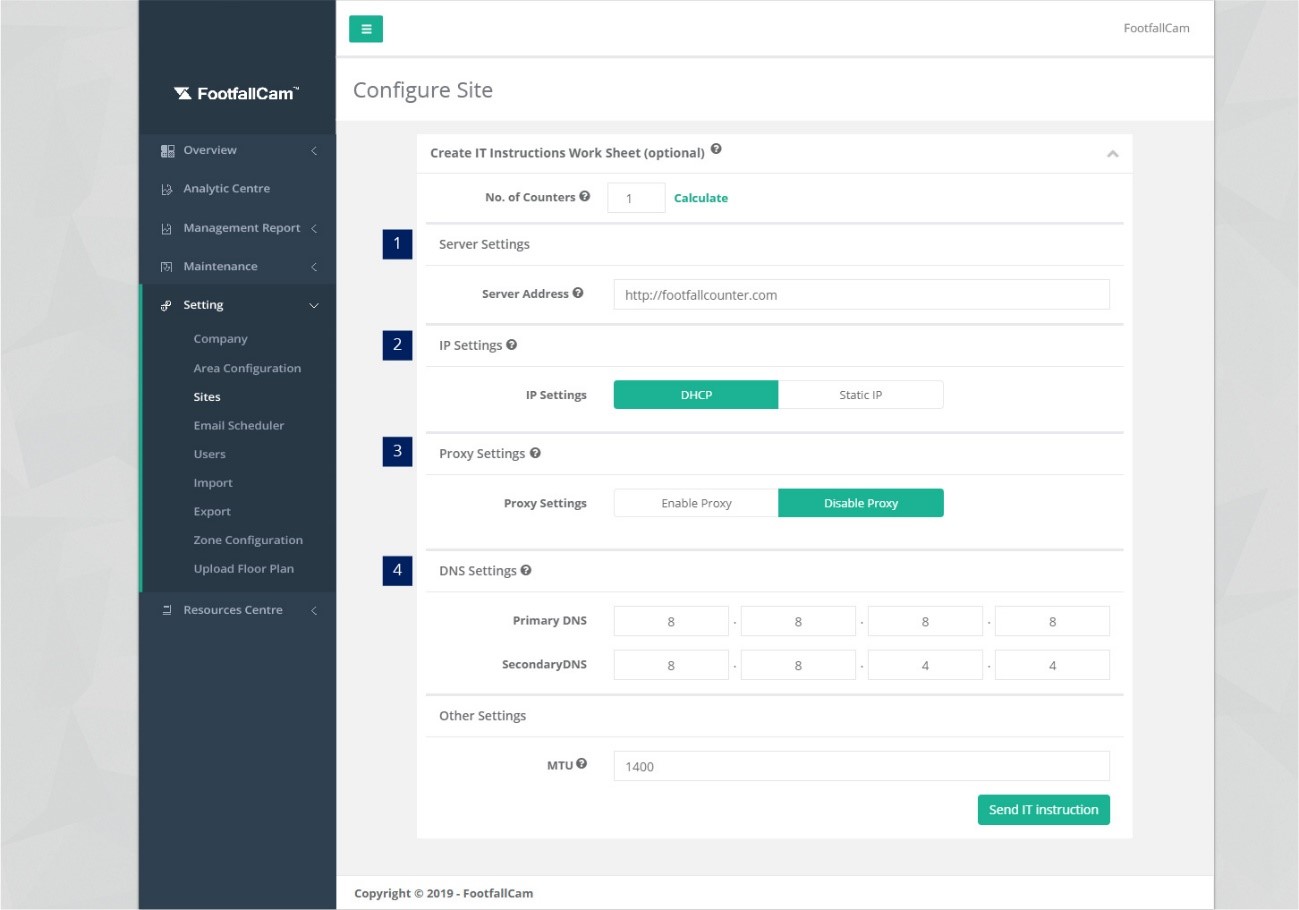
STEP 3 - Navigate to section Create IT Instruction Work Sheet.
STEP 4 - Complete the process by entering all the required fields and click on Send IT Instruction.
|
Item |
Description |
|
1. Server Address |
Enter the server address if user is not using the FootfallCam Cloud Portal. |
|
2. IP Setting |
Enter the IP setting if user may set as static IP. |
|
3. Proxy Setting |
Optional setting if user is using a proxy server to connect internet. |
|
4. DNS Setting |
Use to identity the location of the webpage. |
3.3.4 Floor Plan Setting
3.4 Removing Site
STEP 1 - Access to FootfallCam Analytic Manager V8™: http://portal.footfallcam.com/Account/Login via Google Chrome.
STEP 2 - Click on Setting > Site Management to access the Site Management & Health Check page.
STEP 3 - Select the site to be deleted and click on the Edit button to access the Site page.
STEP 4 - Complete the process by click on the Delete Site button at the top right corner of the page.
3.5 Export Branch List
Users that would like to export the list of sites they have created may choose to do so via the Site Management & Health Check page on the FootfallCam Analytic Manager.
1. Go to Site Management & Health Check page, there is a button, 'Export Branch List' on top right of the page.

2. Click the button and you will be able to obtain an excel file with all the details for all branches:
|
Item |
Description |
|
1. Site name |
The name of the branch to display for reporting purposes |
|
2. Site Code |
Store ID displayed in the reports and used to identify each store when there are multiple stores within a geographic region |
|
3. IT settings |
i. Pairing code ii. Server address ii. DNS settings |
|
4. Country |
Country used for mapping of coordinate to display within the reports |
|
5. Time zone |
Time zone setting for when reports can be updated to the server |
|
6. Operating Hours |
Normal: hour of operations for the store. Special / Custom: custom hour configuration may be set for holidays. |
3.6 Site Group Configuration
A company with multiple sites or multiple stores in different region can have global company views and reports in Analytics Managers. These reports can group by custom categories such as country, store size or ownership. This section explains the way to add custom category (site group) in the site.
3.6.1 Create New Site Group
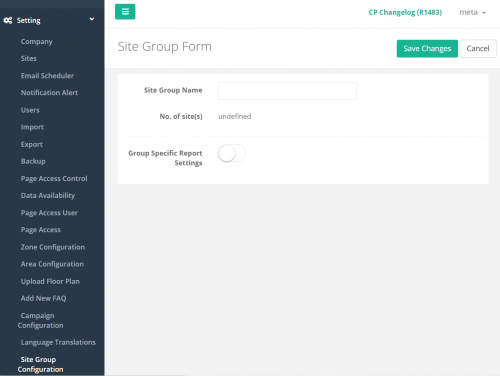
STEP 1 - Click on Setting > Site Group Configuration to access the Site Group page.
STEP 2 - Click on Create Site Group button to access the Site Group Form page.
STEP 3 - Complete the process by entering all required fields and click on Save Changes button.
|
Item |
Description |
|
1. Site Group Name |
Enter a preferred site group name for the FootfallCam Analytic Manager V8™ account. (Info: Site group name inserted will be apply to reports in FootfallCam Analytic Manager V8™) |
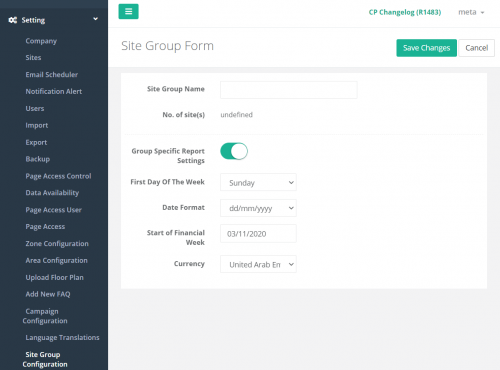
3.6.2 Configure Group Specific Report Settings
STEP 1 - Click on Setting > Site Group Configuration to access the Site Group page.
STEP 2 - Click on Edit button of the newly created site group.
STEP 3 - Turn ON the Group Specific Report Settings.
STEP 4 - Complete the process by entering all required fields and click on Save Changes button.
|
Item |
Description |
|
1. First Day Of The Week |
Select the first day of the week. (Info: This date will be applied to report feature.) |
|
2. Date Format |
Select the preferred date format. (Info: The format selected will be applied to report feature.) |
|
3. Start of Financial Week |
Select the first day of your company's financial week. (Info: The date selected will be applied to report feature.) |
|
4. Currency |
Select the applicable currency. (Info: The currency selected will be applied to report feature.) |
3.6.3 View Report using Site Group
There are two options to view reports using site group as a filter, which are Analytic Center and Company Report.
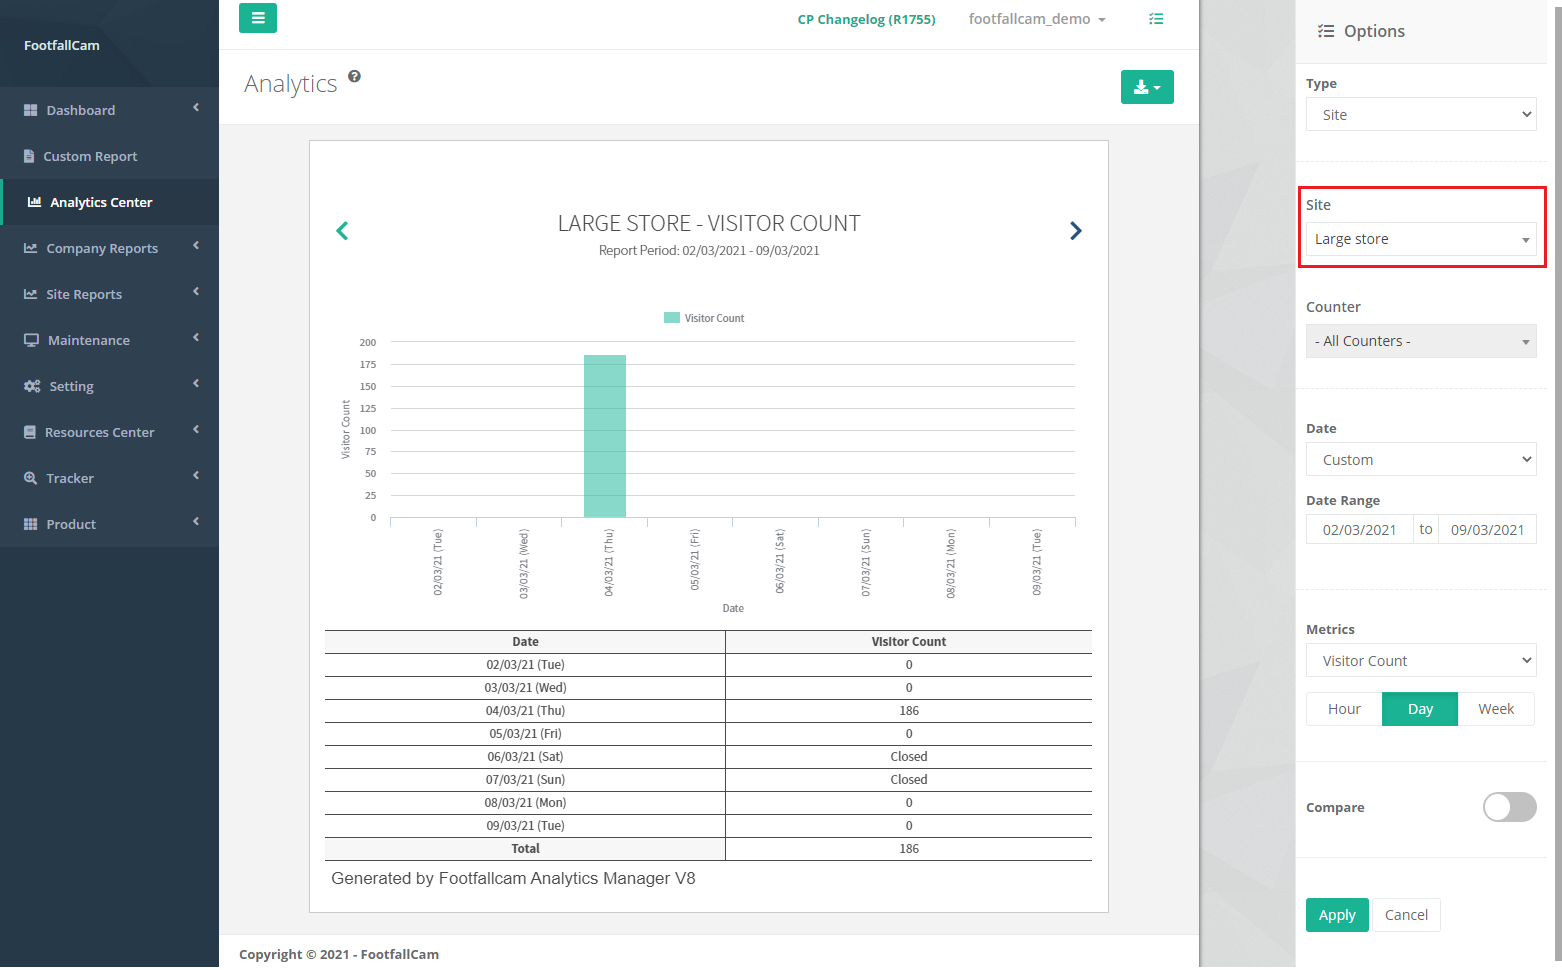
3.6.3.1 Analytic Center
STEP 1 - Click on Analytic Center to access the Analytics page.
STEP 2 - Navigate to Site field at the right panel and select the site group you wish to view.
STEP 3 - Click the Apply button to update the report with filter.
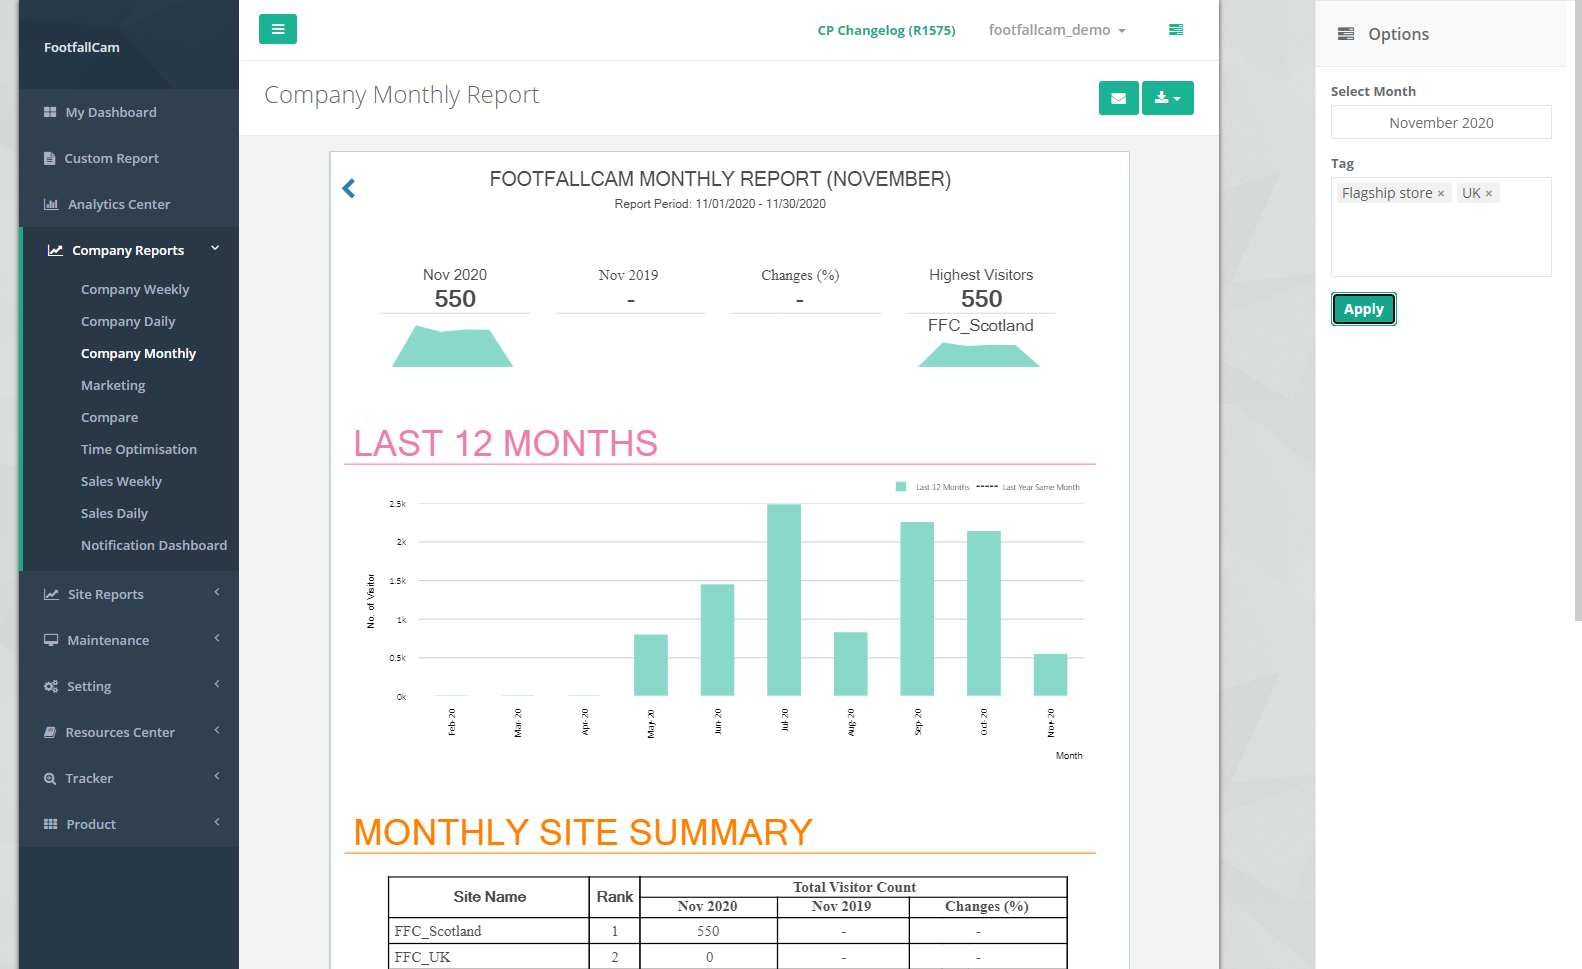
3.6.3.2 Company Report
Site Group can be applied to company reports that are Company Daily Report, Company Weekly Report, and Company Monthly Report.
STEP 1 - Click on Company Reports > Company Daily to access the Counter Management page. (You may select Company Weekly or Company Monthly reports as well.)
STEP 2 - Navigate to Tag field at the right panel and add the site group you wish to view.
STEP 3 - Click the Apply button to update the report with the filter.