


20.1 Zone Counting for Malls
20.1.1 Configuring counter type and Wifi threshold
Once all counter has been allocated to the server level, the user will need to create a corridor group for the device via the counter management page. This will ensure that each counter type will separate the counting for entrances and corridors. This is due to corridor counting is not the figure of visitors entering the shopping mall.

- Enter the Counter Management page via the menu bar on the left.
- Specify the counter and click on Details.
- In the field Corridor, input the name of the entrance of corridor if it is not available from the list of drop down and click the Save icon
- Adjust the threshold of the Wifi reception and click the Save icon
20.1.2 Zone configuration
After the corridors and entrances have been named, the user will be required to configure the zone of the counters installed. To do so, the user will first need to upload the floor plan of their shopping mall into the FootfallCam Analytic Manager, identify their zone and the distance, and finally, allocate the counter to the zone.
To upload the floor plan, the user will need to:
- Select the Zone Configuration options from the menu on the left
- Select the option Add floor plan
- Specify the directory of the floor plan and upload
20.1.2.1 Identifying the zone
After the floor plan has been uploaded into the FootfallCam Analytic Manager, the user will be able to identify the zones within the shopping mall according to the FootfallCam counters that were installed.

- Select the Zone Configuration page from the menu on the left
- Select Edit
- Click on Add Zone
- Input the name of the zone
- Click on Create
- Drag and drop the created zone onto the floor plan from the FootfallCam Analytic Manager
20.1.2.2 Allocating the counter to the zone
When the floow plan has been uploaded to the FootfallCam Analytic Manager and the individual zones have been identified, the counters will need to be allocated to the zone in the floor plan. The user must be aware that only one counter can be allocated to one zone.
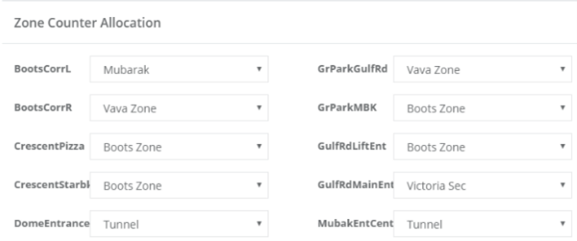
- Select the Zone Configuration page from the menu on the left
- Select Edit
- Select the zone from the drop-down list for each of the counters
- Click Save